


Serious Eats / Amanda Suarez
Every year, a few days after Christmas, some families in Japan gather to celebrate Shogatsu, the Japanese New Year, by pounding hot, steamy rice into mochi. Using a large wooden mallet called a kine, they take turns hitting the steamed grains in a one-meter diameter usu (mortar) carved from a tree stump, rhythmically turning the rice by hand between strikes, until the rice transforms into a smooth, sticky dough. “It’s a family affair,” says Nancy Singleton Hachisu, who has resided in rural Japan since 1988 and is the James Beard Award-winning author of Japanese Farm Food and Preserving the Japanese Way. “Mochitsuki is a time for community and gathering.”
What Is Traditional Mochi? Why Should You Make It?
Soft, chewy, and sticky, mochi is a rice cake that can be served in a multitude of ways: grilled, boiled, wrapped around anko (red bean paste), dipped in kinako (roasted soybean flour), and even deep fried. Its name, “mochi,” comes from mochi gome, the type of short-grain glutinous rice it’s made from.
Mochitsuki (mochi pounding) is a tradition dating back to at least the 8th century, with origins going back much farther to ancient China. Throughout history, mochi has held cultural significance for several occasions, from celebrating the New Year to childbirth and marriage, but by far the most common time for making and eating mochi is during Shogatsu.
Serious Eats / Amanda Suarez
For many, the notion of mochi evokes multicolored shapes (fruits, even animals) and molded confections popular in Japanese convenience stores and candy shops. For many more, mochi might be most closely associated with ice cream. But Hachisu is quick to point out that these foods are often not made with mochi in the most traditional sense. “Those [confections] are the furthest thing from mochi,” she says. “It doesn’t taste the same, because it’s made from mochiko flour—not from freshly steamed rice.” The vast majority of mochi you find commercially is not hand-pounded.
Modern food processing has made it possible to mix mochi at home from a fine, boxed powder or flour. You mix mochiko (or shiratamako) with water, cook it over the stovetop or microwave, and boom—mochi on the fly. But all that convenience comes at a price. “That stuff is pretty much flavorless in comparison,” Hachisu says. There’s nothing wrong with it. But it lacks a few things: flavor and texture, and in a more sentimental sense, the feelings of tradition, process, gathering, and community which make mochi such a special food in the first place.
The Challenge of (and Solution to) Making Pounded Mochi at Home
Developing a pounded mochi recipe for the home cook presents several challenges. For one, I’m pretty sure most people don’t own either an usu or a kine. Second, mochitsuki is traditionally performed outdoors or in a large, open area with plenty of room to swing a big old mallet. “You’re never gonna be able to do it at home,” Hachisu says. At least, not in the traditional way.
Third, there’s the communal aspect of making mochi. “Ideally, you’d make mochi with your family, or with friends, with people in the neighborhood,” Hachisu says. “The idea of community is so essential to making mochi.”
While I can’t necessarily solve these issues—after all, recipes are typically written for a single user, and we recipe developers are generally loner types to begin with, faffing around with culinary minutiae—I considered a few alternatives to the traditional pounding process.
Large Mortar and Pestle: A mortar and pestle seemed an obvious choice to replicate the pounding and kneading of mochitsuki. I had passable results with small volumes of rice, but the yields were pitiful; a typical mortar simply doesn’t have enough capacity. And because of that small capacity, the rice tended to cool down too quickly before forming a cohesive, smooth paste. The rapid cooling made pounding prohibitively difficult as the paste thickened. This method took upwards of 15 minutes for a cup of dry rice, and the result was grainy and unappealing.Mochi-Making Machine: For those intent on regularly enjoying pounded mochi at home, you can buy dedicated mochi-making machines from reputable rice cooker companies like Zojirushi and Tiger. Marketed as all-in-one rice cooking and mochi-making devices, these machines set you back anywhere from 200 to 500 dollars. While I was tempted to try these machines out, I concluded that most home cooks wouldn’t be willing to drop that kind of money for such a specialized piece of equipment.Stand Mixer: When I suggested using a stand mixer to replicate the pounding and kneading process, Hachisu was skeptical. “You know, I had one of those KitchenAid stand mixers once. I’m pretty sure I threw it out,” she joked. In her estimation, the mochi dough might overwhelm the mixer, burning the motor out. “I’m not sure that it would work,” she said. “But I’ve also never tried it. So feel free to prove me wrong.”
The stand mixer does, in fact, work. Using a combination of the dough hook and the paddle attachments yielded the best results. The dough hook accomplished the initial kneading and helped to form a cohesive mass; whipping the dough with the paddle attachment broke the grains further apart, yielding a smoother result. And the best part? The work can be done quickly while the rice retains its heat.
Serious Eats / Amanda Suarez
There are still limitations to this method. Compared to the texture of store-bought mochi or mochi made the traditional way, the resulting dough isn’t perfectly smooth—just ever-so-slightly grainy if you hold a cross-section up to the light. But in terms of eating quality and the handling of the dough, that graininess is imperceptible. Additionally, I found that there was an upper limit on the volume of rice my 7-quart KitchenAid mixer could handle—around 3 cups of dry rice. So depending on the model and capacity of your stand mixer, your mileage may vary.
Other Keys To Mochi Success
Type of Rice
Good mochi starts with selecting the proper rice variety and quality. For one, mochi gome, or short-grain japonica glutinous rice, is essential. Glutinous rice is nearly 100 percent amylopectin, one of two main polysaccharides found in starch, along with amylose. Amylopectin tends to form a sticky, viscous but flowing gel. Higher amylose rice varieties, such as jasmine rice, are not suitable for making mochi, since they don’t form a sticky gel when blitzed apart or pounded.
Rice Cooking Methods
The traditional method for cooking rice is twofold: the rice is first soaked overnight in water, then it is wrapped in muslin cloth and steamed for about an hour under a heavy wooden lid over an iron pot of water until the grains are tender. Soaking ensures that the rice cooks evenly when steamed, and some studies suggest that it reduces the protein content of the rice and also improves both shine and eating quality.
I tried to replicate this steaming method with cheesecloth and either a bamboo steamer or a heavy-lidded Dutch oven. While the Dutch oven produced good results results, it was a finickier process that required having to consistently check the grains by opening up the cheesecloth. The bamboo steamer, on the other hand, didn’t produce evenly cooked grains, and tended to stain the grains slightly brown.
Hachisu also recommended using a rice cooker (without soaking the grains beforehand)—though this is far from a traditional technique. This gave me consistent results, so I could really dial the ratio of water to rice to mimic the texture of properly steamed rice. I was curious if omitting the soaking step affected the texture and appearance of the dough, but I found the differences too minute to tell. If you’re a purist, stick to steaming. Otherwise, rice prepared in a rice cooker works just fine.
Heat
Another fundamental aspect of mochitsuki involves maintaining heat while pounding the rice. If the rice cools too much before the paste reaches the target consistency, then pounding becomes increasingly difficult, and the finished texture isn’t ideal. It’s also a pain to handle the dough when it’s cold, so the mixing, pounding, or kneading must be done quickly. “It’s a race against time,” says Hachisu.
Fortunately, the stand mixer does the heavy lifting here. But to maintain the temperature of the dough, I found it helpful to keep a rigid silicone spatula dipped in boiling water nearby. That hot, wet spatula made it easy to scrape down the sides of the bowl and fold the dough over itself, mimicking the motions of folding by hand.
Rolling, Shaping, and Katakuriko
Serious Eats / Amanda Suarez
Once the mochi is mixed, it is usually formed into shapes and eaten right away. No matter what form mochi takes, it is customary to coat the work surface with katakuriko (potato starch). In fact, without potato starch, the mochi dough is nearly impossible to handle because of how sticky it is. A liberal dusting of katakuriko makes portioning, rolling, or pressing a relatively painless endeavor.
Drying
For the specific style of mochi called yakimochi (grilled mochi) shown in this recipe, it’s helpful to dry the mochi before cutting and cooking. These cut squares, known as kirimochi, are often sold commercially in vacuum sealed packs. The drying process forms a skin on the surface of the mochi, which allows the mochi to puff up dramatically over the grill or when toasted. The result is a crispy, crunchy exterior that gives way to a soft, chewy interior.
Serving Suggestions
There is no shortage of serving options for mochi. While this recipe produces a mochi dough suitable for enrobing or rolling into various shapes, I wanted to offer mochi in its more unadorned form. “My favorite way to eat mochi is just toasted in the oven, maybe brushed with a little soy sauce,” says Hachisu. “Mochi is all about the rice, that delicate flavor.”
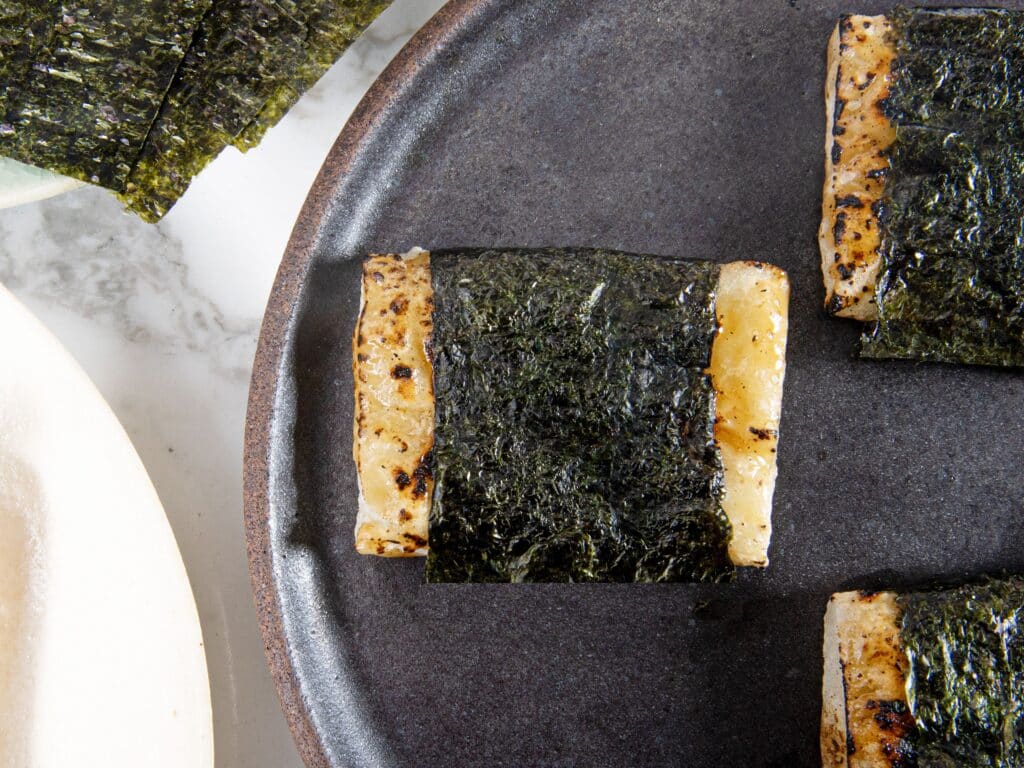
Ideally, yakimochi are cooked on a Japanese grill called a konro, ideally over binchotan coals. To replicate this at home, I opt for the strategic use of a blowtorch to get those charred, smoky edges and encourage the mochi to puff on all sides (if you don’t have a blowtorch, you can use a broiler, though it will be more difficult to get even browning). The grilled mochi are brushed with a simple tare thickened with potato starch, wrapped in nori, and eaten hot—a serving style known as isobeyaki.
If you don’t have a grill or a blowtorch, a toaster oven (or an oven) is your next best option. The broiler setting produces a similar effect as a grill, albeit with less pronounced blistering or charring.
If you prefer sweeter options, you can drizzle the mochi with brown sugar syrup and serve it with some kinako (roasted soybean powder) or with globs of anko (red adzuki bean paste).
Continuing Traditions
Several years ago, Hachisu stumbled upon people making mochi while traveling through an airport. “It was probably a PR event,” she says. They wore gaudy, extravagant Japanese costumes, which were fake. They were shouting in a touristy, obnoxious way. “It was kind of sickening, to be honest. That’s not mochi.”
But all around Japan, there are enclaves of people carrying on the true traditions of mochitsuki, mostly in rural areas. “There are plenty of young people who come to our farming area, seeking a more natural life,” says Hachisu. They learn the tradition, revive it, and carry it on. Beyond the action itself, mochitsuki is about community and gathering.
How do you bring that feeling to your home? Hachisu recommends inviting friends over to make mochi—even if you happen to be using a stand mixer, with no usu or kine in sight. And if you can’t gather? You might as well share. As we wrap up our interview, Hachisu remembers to send a little mochi to her son who’s moved across the ocean to Brooklyn—so he can enjoy a little taste of home.
For the Mochi: In the bowl of a rice cooker, combine rice and water. Cook rice according to rice cooker settings for “white rice,” until grains are cooked through and translucent, about 45 minutes.
Serious Eats / Amanda Suarez
In a large pot, bring 3 quarts of water to a boil. Pour 4 cups of the boiling water into the bowl of a stand mixer, then pour out the water (this warms up the bowl and helps to maintain the heat of the rice as it’s beaten.) Keep the remaining boiling water in the pot with a rigid silicone spatula in it (this keeps the spatula warm and moist for scraping down the sides of the bowl). Immediately transfer rice to the warmed stand mixer bowl and, using a dough hook, mix on medium speed until the rice forms a coarse paste, about 2 minutes. Stop stand mixer and, using the hot spatula, scrape down rice to the center. Continue mixing until paste is smoother, about 1 minute longer.
Serious Eats / Amanda Suarez
Switch to paddle attachment, scraping any excess paste off the dough hook. Mix on medium speed until paste is smooth with minimal visible grains, 3 to 5 minutes, stopping to scrape sides down with the hot spatula, until the dough is pliable. (There will still be some graininess; that is okay.)
Serious Eats / Amanda Suarez
Using a fine-mesh strainer, dust a 9- by 13- inch rimmed baking sheet or baking dish liberally with potato starch. Scrape dough onto prepared pan and dust the top of the dough liberally with additional potato starch. Using clean, dry hands, press dough to edges of the pan, smoothing and leveling the dough until it is about 1/2 inch thick and the surface is flat. Place dough in freezer and chill until edges release easily from the pan and the dough is firm but not frozen, about 1 hour.
Serious Eats / Amanda Suarez
Transfer dough to a large cutting board. Using a sharp knife, cut dough into 2- by 3-inch rectangles (you should have 14 to 16 portions); wipe the knife down with a wet paper towel between cuts to keep the edges of the mochi clean. Arrange mochi on a wire rack and let dry at room temperature, flipping mochi once after 12 hours, until the surface is firm and no longer sticky, 24 hours.
Serious Eats / Amanda Suarez
For the Sauce and to Serve: In a medium saucepan, whisk together mirin, water, soy sauce, sugar, and potato starch. Place saucepan over medium heat, bring mixture to boil, and cook, stirring occasionally, until bubbling subsides and the mixture is thickened, glossy, and coats the back of a spoon, 4 to 6 minutes. Transfer mixture to a heatproof bowl and cool to room temperature. Set glaze aside until needed.
Serious Eats / Amanda Suarez
Line a rimmed baking sheet with foil. Using a dry pastry brush, brush excess potato starch from the surface of mochi. Place the portioned mochi on the prepared baking sheet. Using a blowtorch, toast the tops and sides of the mochi until it begins to puff up and blister all over. Flip and repeat until all the mochi have been evenly torched. (A lightly charred or blistered appearance is okay.) Alternatively, hold the mochi on a rimmed baking sheet about 4 to 6 inches under a broiler element until puffed and blistered all over, then flip and repeat on other side (it will be more difficult to brown the mochi evenly all over with a broiler, so a blowtorch is preferable).
Serious Eats / Amanda Suarez
Transfer cooked mochi to a wire rack, and brush each portion with sauce to coat. If desired, wrap each piece of mochi with nori and place seam-side down. Serve right away.
Serious Eats / Amanda Suarez
Special Equipment
Rice cooker, stand mixer, pastry brush, blowtorch or broiler, wire rack
Notes
The mochi may blow out and burst while it’s being torched. This is normal—continue to evenly torch the mochi.
Do not use non-glutinous rice, since the resulting dough will not be as cohesive or chewy.
Make-Ahead and Storage
Dried mochi can be kept in a single layer in a zipperlock bag and frozen for up to 2 weeks.